Refresh The Old Potting Soil in Your Container Garden
This post may contain affiliate links. Please read our disclosure policy.
If you’ve been gardening for a bit, you probably know that I’ve transitioned from a massive traditional garden bed to mostly container gardening using GreenStalk vertical planters. There’s just something about container gardens that makes life easier—less weeding, more water retention, and a lot more control over specific plants. But here’s the thing I see a lot of people miss: refreshing your container soil.
Yep—whether it’s a raised bed, flower bed, or stackable tower, that old potting soil needs a little love. Unlike garden soil that naturally replenishes over time, container plants are isolated from all those beneficial microbes, worm castings, and organic materials that support plant health in an in-ground garden. If you’re reusing used soil from last year, this is a great time to refresh it before planting again.

🌿 Why Refreshing Container Soil Is a Game Changer
Let’s start with the basics. When you grow in the ground—like in vegetable gardens or a compost-enriched flower bed—you’re working with a living ecosystem. Garden beds get naturally enriched by rainfall, decomposing organic matter, and critters like earthworms. But container gardening is a different ball game.
In a container, your soil becomes a closed system. Whether you’re filling a large container or a single tier of a vertical planter, the old soil inside slowly runs out of essential nutrients. Plant roots pull everything they need from the mix—especially during a productive growing season—and unless you replenish it, plant growth will start to suffer. You may notice your plants look smaller, less productive, or just…tired. That’s not your fault! It just means your soil level is low on what your plants need.
A fresh mix full of organic matter, moisture-retaining amendments, and slow-release fertilizer can transform your whole experience. It helps improve soil structure, supports plant roots, and reduces the chance of plant disease from exhausted or compacted soil.
🛠️ What I Use to Refresh My Container Soil
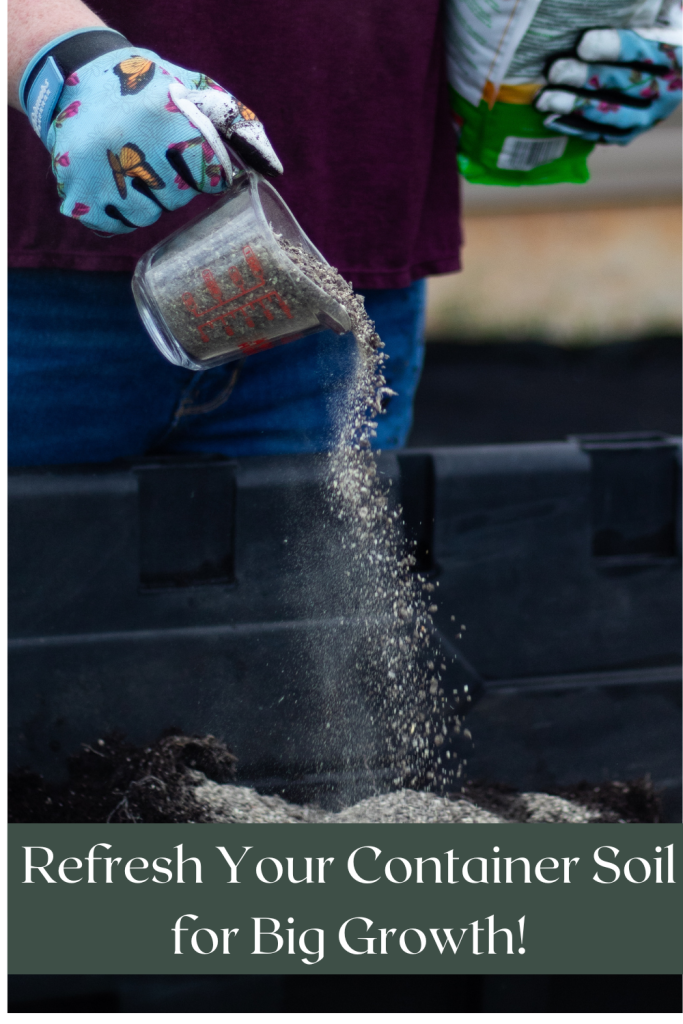
Let’s break down my soil refresh process tier by tier. I usually work with one tier of my GreenStalk at a time (instead of the entire pot or a large container all at once). That helps minimize waste and makes it manageable—especially if you’re reusing spent potting soil from the previous season.
Here’s my go-to refresh mix:

Pro Mix Potting Mix – This is my fresh potting mix of choice. It has peat moss and perlite for moisture retention and water drainage, which are both super important in container gardens.
Garden Tone Organic Fertilizer – I’ve tried quite a few fertilizers over the years, but I always seem to end up back with Garden Tone. It’s just easy to use and gives steady results. I don’t overthink it—I just sprinkle it in, mix it up, and my plants seem to thrive. It’s full of real, earthy stuff like feather meal and composted manure… nothing fancy, but it works.

Fresh compost – Whether it’s from your compost pile or a bagged version, compost adds the organic matter your plants are craving.
Optional: Bunny Poop – I know it sounds a little weird, but if you’ve got rabbits, their poop is basically garden gold. You don’t have to do anything special with it—I just scoop it up and mix it in like anything else. It’s not going to burn your plants or cause problems, and it’s such an easy way to sneak in a little extra goodness for your soil.

Handfuls of Perlite or Coconut Coir – If your soil’s looking tired, crusty, or like it just doesn’t want to hold water anymore, this is where I start tossing in a few handfuls of perlite or coco coir. Sometimes I even throw in a little pine bark if I have it. You don’t have to measure—just eyeball it. The goal is to loosen things up so water soaks in instead of running off, and so the roots can actually breathe.
🌱 Why I Prefer Organic Fertilizers Over Chemical Ones
I know chemical fertilizers can give your plants a quick boost, but over time, they can do more harm than good. They feed the plant, sure—but they don’t do anything for the soil itself. After a season or two, you can really start to tell when your soil is worn out. It gets kind of clumpy, doesn’t hold water as well, and your plants just don’t look as happy. They’ll grow, but not like they used to. That’s usually a sign the soil’s missing what it needs.
That’s why I stick with organic fertilizers—especially Garden Tone. It’s not trying to be flashy or do everything all at once. It just feeds the soil slow and steady, the way plants actually like it. I usually toss in a few cups per tier when I’m refreshing my GreenStalks and mix it in with compost and whatever else I’ve got going that day. Nothing fancy—just real, steady nutrients that keep things growing.

Quick tip: since it’s made with things like blood meal, animals might try to rip into the bag (ask me how I know…). I either keep it in a sealed tub or store it inside until I’m ready to use it.
🔁 Step-by-Step Soil Refresh Process
Here’s my easy method for giving old potting soil new life. Whether you’re working with a single pot or a large container, this process works:
Remove the old soil
I scoop the soil from one tier and dump it into my Gorilla Cart or mixing tub. Don’t worry if you find some roots or bits from last year’s plants—they’re actually helpful. I leave most of the roots in because they’ll break down and improve the soil structure.
Break it up
I just grab a shovel—or sometimes I use my hands—and start crumbling it up. You don’t need to overthink it. The goal is to loosen things up and get some air back in there before adding the good stuff.

Add your amendments
Here’s where the magic happens. I mix in:
- ~3 cups of Garden Tone
- ~¼ to ⅓ cubic foot of fresh compost
- A scoop or two of coco coir or perlite (or both!)
- Optional: bunny poop or worm castings if I’ve got them handy
Moisten the soil
Feel the mix before you put it back in your container—if it’s dry and powdery, it’s not going to do much good. I like it to feel kind of like a damp brownie… not soggy, but definitely not dusty. A little water at this stage goes a long way toward helping everything settle and hold moisture better once your plants are in.
Refill your container
Once it’s all mixed, I scoop the soil back into the tier. If I come up a little short, I just toss in some fresh potting mix until it’s topped off and ready to plant.
That’s it!
Seriously, that’s the whole thing. It sounds like a lot the first time, but once you do a tier or two, it becomes second nature. Your plants will be so much happier for it.

💧 Extra Tips for Soil That’s Dry or Water-Resistant
If you’ve got an old bucket of soil that’s been sitting around a while—maybe leftover from last year—it can get real dry and crusty. Sometimes you pour water on it and it just beads up or runs right off. Been there. It usually happens when there’s a bunch of peat moss in the mix.
Here’s how I bring it back to life:
- I mix in a little compost
- Then I grab a few handfuls of perlite or coco coir—just eyeball it until the mix feels looser
- After that, I add a bit of water at a time and stir it in with my hands. Doesn’t have to be exact—if it’s not dusty and holds together when you squeeze it, that’s close enough for me
Once you get it worked in, it starts acting like normal soil again. It’ll hold moisture better and won’t leave your plants struggling for water.
🌸 Keeping Your Container Garden Healthy All Season Long
Refreshing the soil gets you off to a solid start, but with containers, you’re the one in charge of keeping everything going. There’s no worms or rain or underground magic happening here—it’s just you and that pot.
Every couple of weeks, I’ll water in a little fish emulsion. It doesn’t smell great, but it gives the plants a gentle boost without overfeeding them.
When that summer heat really settles in, I keep an eye on the soil. If it starts drying out too fast, I’ll throw on a handful of mulch or top off the container with some fresh mix. Doesn’t have to be fancy—just enough to help stretch out the time between waterings and keep your plants from getting stressed.

⚠️ Let’s Talk About Nitrogen
This one’s easy to overdo. If you use too much nitrogen, your plants will look great—big and green—but you won’t get much fruit. I’ve definitely made that mistake before.
So here’s what I do:
- Use something higher in nitrogen early on to help plants get established
- Once they start blooming, switch to a more balanced option so they’ll actually set fruit
It’s a small adjustment, but it makes a big difference in what you actually harvest.
🌬️ Handling Windy Conditions with Your GreenStalk Planters
Living in Oklahoma, I’ve learned a few things about gardening in the wind (hello, tornado capital of the U.S.). People often ask me if these tall, stacked GreenStalk planters can really hold up in high wind—and the answer is yes, if you set them up right.
Here’s what helps:
- Water thoroughly before storms. The added weight gives each tiered container more stability.
- Place on flat ground. If your patio or porch isn’t level, use bricks or tiles to help avoid tipping.
- Avoid black plastic bags or loose covers nearby that can whip around and knock things over.
- Good quality containers like the GreenStalk have strong construction—but placement matters too.
If you live in a wind-prone area or are thinking of expanding your container gardening setup, this is a good idea to keep in mind.
🌟 A Little Inspiration and Encouragement
Refreshing your container soil might not be the flashiest job, but don’t let that fool you—it makes a bigger difference than you’d think. I didn’t think much about it when I moved from raised beds to vertical planters. Honestly, I was just watching for green leaves and hoping for a few tomatoes.
But it didn’t take long to figure out that if the soil wasn’t doing its job underneath, nothing up top was going to do much of anything either.
I’ve had plenty of old mix come back to life with just a few tweaks. I’ll throw in some compost, add a bit of fertilizer, give it a stir—done. You don’t need to overthink it. The goal isn’t perfect soil. You’re just trying to give your plants something better to grow in than what they had last season.
🐻 Wrapping It Up: Your Soil Refresh Checklist
Let’s go over the basics one more time—here’s how I bring old container soil back to life:
✅ Pull out the old mix and give it a good stir to break things up
✅ Mix in a scoop of organic fertilizer, a bit of fresh compost, and something that helps hold moisture
✅ I usually toss in some coco coir, pine bark, or perlite—whatever I’ve got handy
✅ Add a little water until it’s evenly damp, then refill your pot or tier
✅ Throughout the season, check in and feed with a gentle liquid fertilizer when needed
✅ Keep an eye on moisture and give your plants a boost if things start drying out
You’re putting in a little effort now to make the rest of the season smoother—and trust me, it’s worth it.

🌿 Helpful Links & Resources
🪴 Let’s Chat a Minute
Have you messed with your container soil lately?
I’d love to hear what’s been working in your garden lately. Got a favorite tip? Or maybe a funny story from this season? Leave a note in the comments—I always learn something from y’all.
And if this post was helpful, I hope you’ll stick around. I’ve got more garden ramblings and real-life tips coming as we go.
Catch you out there! 🌱