7 Easy Ferments to Try This Week
This post may contain affiliate links. Please read our disclosure policy.

If you’ve been around my kitchen very long, you know I’m always drawn to the kinds of projects that take something ordinary and turn it into something beautiful. Fermentation is exactly that. A head of cabbage, a handful of carrots, or even just a couple cloves of garlic, add some salt and a little patience, and suddenly you’ve got food that’s alive, nourishing, and full of flavor.
This week on YouTube, I shared seven easy ferments that just about anyone can make at home. No gadgets or complicated steps, just simple food, prepared in a simple way. If you’ve been curious about fermenting but didn’t know where to begin, consider this your gentle nudge to give it a try.

Why Ferment?
Fermentation isn’t a new skill, it’s an old one. Long before refrigerators and freezers, families relied on it to keep food safe and edible. But preservation is really just the beginning.
Here’s why I keep coming back to it:
- It’s simple. No canners, no fuss. Just vegetables, salt, and a jar.
- It’s healthy. Fermented foods are rich in probiotics that support digestion and gut health.
- It’s flavorful. Carrots turn tangy, garlic softens into something buttery, and zucchini becomes the crispest pickles.
- It’s rooted. There’s something deeply steadying about practicing the same rhythms our great-grandmothers did, preserving food in a way that connects us to generations before us.
And truthfully? I love the delight of opening a pantry, seeing the faint fizz in a jar, and realizing there’s life happening right there in my kitchen.
7 Easy Ferments with Instructions
Here’s a quick look at the seven ferments we made this week. Each one takes just a few minutes to prepare, but they’ll reward you with days, weeks, and sometimes months of good eating.

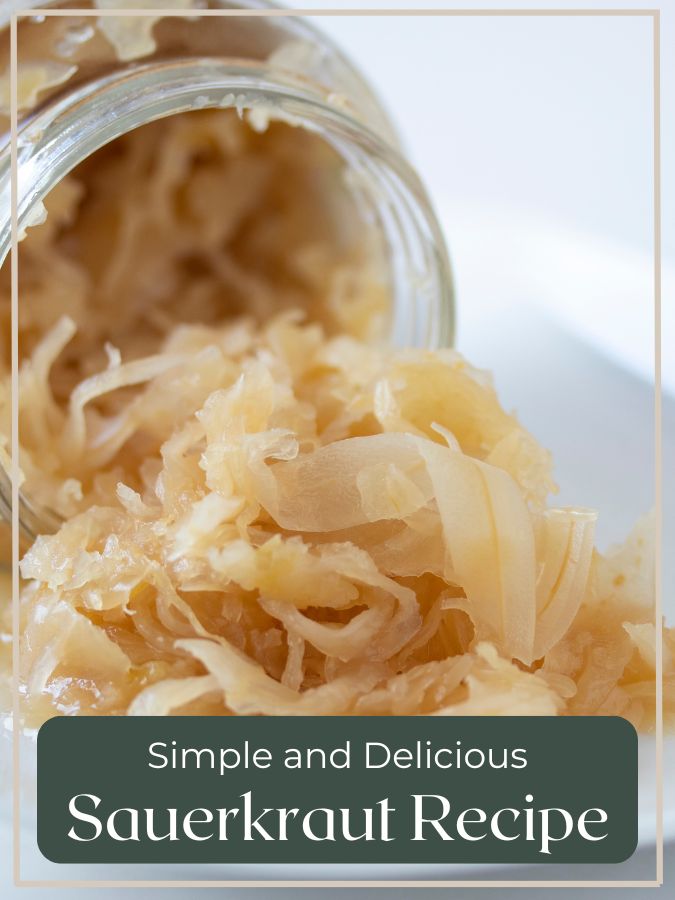
1. Sauerkraut
This is where most of us begin, and for good reason. Cabbage, salt, and time—that’s it.
You’ll need:
- 1 medium cabbage (about 2 lbs)
- 1–1½ Tbsp sea salt
How to make it:
- Shred the cabbage and place it in a large bowl.
- Sprinkle with salt and massage with your hands until it begins to release liquid.
- Pack it tightly into a clean quart jar, pressing until the brine rises above the cabbage.
- Place a weight on top, cover loosely, and let it ferment 7–14 days at room temperature. Taste along the way until it’s as tangy as you like.
Find the full detailed recipe HERE

2. Carrots
Crunchy, slightly sweet, and often the first ferment my kids reach for.
You’ll need:
- 3–4 medium carrots, cut into sticks
- 1 clove garlic (optional)
- 1 Tbsp salt
- 2 cups water
How to make it:
- Dissolve salt in water to make a brine.
- Pack carrots (and garlic, if using) into a quart jar.
- Pour the brine over the top, leaving an inch of headspace.
- Weigh down, cover, and ferment 5–10 days.

3. Zucchini Pickles
If your garden (or your neighbor’s) is overflowing with zucchini, this is such a fun way to use it up. Fermenting zucchini turns it crisp and tangy—very much like a cucumber pickle, but with its own unique flavor.
You’ll need:
- 4–5 small zucchini, cut into spears or coins
- 2 Tbsp salt
- 4 cups water
- Optional: garlic, dill, mustard seed
How to make it:
- Dissolve salt in water to make a brine.
- Pack zucchini and any seasonings into a quart jar.
- Pour brine to cover, leaving 1 inch headspace.
- Weigh down and cover. Ferment 5–7 days for a lighter pickle, or up to 2 weeks for deeper tang.

4. Honey-Fermented Garlic
This one feels like kitchen medicine at its best. The sharpness of raw garlic mellows in honey, creating cloves that are sweet, spreadable, and packed with immune-boosting goodness.
You’ll need:
- Peeled garlic cloves (enough to fill a pint jar about halfway)
- Raw honey
How to make it:
- Place garlic cloves in a clean jar.
- Pour raw honey over the top until fully covered.
- Put the lid on loosely (to allow gases to escape) and set the jar on a plate in case of overflow.
- Tip the jar gently every day to keep the cloves coated.
- Let it ferment at room temp at least 1–2 weeks before tasting, though the flavor will keep deepening for months.

5. Onions
Bright, tangy, and ready to liven up tacos, salads, or sandwiches.
You’ll need:
- 2 medium red onions, sliced
- 1½ Tbsp salt
- 2 cups water
How to make it:
- Dissolve salt in water to make a brine.
- Pack onions into a quart jar and pour the brine over the top.
- Leave 1 inch headspace, weigh down, and cover. Ferment 5–7 days.

6. Dilly Beans
Crunchy, tangy, and full of flavor—fermented green beans are one of the easiest ferments to start with.
You’ll need:
- 3–4 cups fresh green beans, trimmed
- 2–3 garlic cloves (optional)
- 2 Tbsp salt
- 4 cups water
- Fresh dill or 1 tsp dill seed (optional, but classic)
How to make it:
- Dissolve salt in water to make a brine.
- Pack green beans, garlic, and dill into a quart jar
- Pour brine over the top until beans are submerged.
- Weigh down and cover. Ferment 5–7 days, or longer for stronger flavor.

7. Apple Scrap Vinegar
A beautiful way to use every bit of the apple. This vinegar is made from cores and peels, turning kitchen scraps into something useful and delicious.
You’ll need:
- Apple cores and peels (enough to fill a quart jar halfway)
- 2–3 Tbsp sugar
- Water
How to make it:
- Place apple scraps in a quart jar.
- Dissolve sugar in water and pour over the scraps, leaving 2 inches headspace.
- Cover with a cloth and secure with a rubber band.
- Stir daily for the first week, then every few days after.
- After 3–4 weeks, strain out the scraps and let the liquid continue fermenting another 2–3 weeks until it smells and tastes like vinegar.
What You Need to Get Started
The beauty of fermentation is that you don’t need much to get going.
- Glass jars (a simple quart mason jar works perfectly)
- Non-iodized salt (sea salt, Himalayan, or pickling salt)
- Optional helpers: fermentation weights and silicone lids like Pickle Pipes
That’s it. Affordable, accessible, and beginner-friendly.
Tips for Beginners
- Taste as you go. Every day your ferment will taste a little different. Stop when it’s right for you.
- Keep veggies submerged. Brine is your friend, air is not.
- Expect bubbles. A little fizz means it’s working.
- Aim for room temperature. Around 65–75°F is ideal.
- Don’t overthink it. If it smells pleasantly tangy and not rotten, you’re on track.

Where Fermenting Fits in My Kitchen
For me, fermentation isn’t separate from the other ways I preserve food, it works right alongside them. In the middle of summer, when the garden is overflowing and I don’t have the time or energy to pull out the canner again, fermentation saves me from waste. I can tuck away those extra handfuls of zucchini or peppers in a jar, and they transform while I move on to the next task.
It also brings variety. Canned green beans are wonderful, but a tangy jar of fermented carrots offers something fresh and different at the dinner table.
And honestly? It’s just plain fun. There’s something deeply satisfying about lining jars on the counter and knowing that, without electricity or effort, nature is doing what it was designed to do, right in my kitchen.
Watch the Video
If you’re curious about the step-by-step process for each of these ferments, I walked through all seven in this week’s video. You’ll see exactly how simple it really is.
Final Thoughts
Fermentation doesn’t have to be complicated or intimidating. With a little salt, some vegetables, and a glass jar, you can start today. Begin with sauerkraut or carrots, taste along the way, and you’ll soon find yourself with jars of food that add life and depth to your meals.
So let me ask: which ferment will you try first? Leave a comment and let me know—I’d love to hear what’s bubbling away in your kitchen.